We all know how difficult it can be to navigate the supermarket alleys when you’re short on time. You try hard to plan your weekly shop, but it always turns into a nightmare. You end up with a lot of food supplies and then lack proper storage to keep things fresh for more than a week. Eventually, everything ends up going straight into the bin causing food wastage.
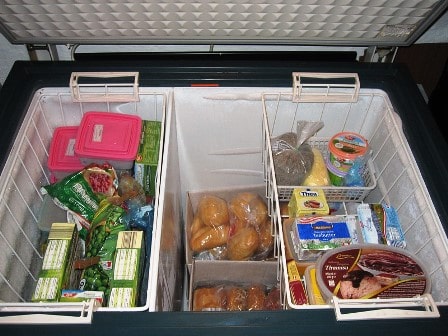
How to avoid this food wastage and also save some extra time by shopping in bulk? The one-stop solution to prevent this from happening in the future is by creating dividers in your chest freezers that will certainly help you to keep food organized and fresh for a longer period of time.
However, there are a few things you need to know in order to make dividers for chest freezers. In short, you will need the right materials, some measuring tape, and an accurate cutting tool. The following steps will help you complete this task and can also make you realize its importance in your everyday chores.
Why do you need dividers for the chest freezer?
The most important purpose of a divider in a freezer is to prevent contamination of food.
Many people are unaware of this and end up wasting tons of food every year. Dividers are so easy to put in place and use along with the necessary benefits. It prevents food from getting spoiled with further deterioration.
Another reason to use a divider is it avoids touching the combined food together in the freezer which keeps the freshness of the stored food intact.
It is also very essential to set up the divider with the appropriate height and shape to avoid leakage of food materials between the dividers.
It also helps in handling dividers when it has to be removed for cleaning purpose. It is also important to make sure that dividers are transparent and tall enough to do their job.
MORE POSTS: How to Install Artificial Turf for Dogs
What are some benefits of a divider in a freezer?
A freezer divider is a great way to keep food fresh. They are essentially a door that separates the freezer into two sections. This allows you to place food in the front section that will not be consumed as quickly. It is a great way to prevent food wastage.
The other benefit of a divider in a freezer is that you can store food in the back section of the freezer which surely is great for people who don’t have a lot of space in their freezer.
A divider in a freezer is also a great way to keep food from getting freezer burned. Moreover, you can also organize your dividers based on color grades such as all the veggies in the green basket, vibrant fruits in the yellow basket, meat in the red basket, and desserts in the pink basket. We can see this color grading in lots of homes today where they organize their kitchen items in the form of rainbow colors to make their little space look more vibrant, fresh, and sorted.
Colors easily manipulate our brain cells to work in coordination and they also boost our mood to work 100% more effectively in the imposed environment. This helps to spend your time in the kitchen with no stress of getting things wrapped up while preparing your everyday meal.
MORE POSTS: 10 DIY Baby Shower Party Favor Ideas for a Boy
What materials do you need to grab for making a divider for an organized chest freezer?
To make a quick divider you need to grab some cardboard boxes, plastic wrap, and foils for a DIY container. You can also use super handy baskets and crates available in the market and stack them on one another to maximize your storage space.
Although keep in mind to take the measurement of the container that can fit into your freezer and then look up similar kinds of baskets. It can be any basket that we use for kitchen storage, office supplies, and storage bin.
Milk craters or meat storage boxes can also be used as dividers. As well as shoe boxes, craft sets, and toy sets can work for creating a proper storage divider in place. If you got some crafting skills then you can also do Plywood DIY for an organized chest freezer.
How to make dividers for chest freezers?
In order to build affordable chest freezers to organize your stuff, you need to spend some time being creative. Above you will find all the necessary materials required to make a divider for your chest freezers that including cardboard, plastic wrap, foils, and cardboard boxes. Now you have all the necessary materials in hand let’s dive deep into the steps you’ve to follow too –
Make a divider for the chest freezer with the help of Cardboard and plastic wraps:
- Start with folding a piece of cardboard in half by cutting both ends
- Transform the shape of cardboard into a container box so it fits perfectly in your chest freezer.
- Afterward, wrap up the cardboard with foil by placing plastic wraps inside the cardboard container box to avoid the cardboard from getting soaked with water residues.
- You can also use a cardboard box to create a divider. This can be done by cutting off the top of the box and then cutting a hole in the top of the box that can be used to fit the divider inside.
Make a divider for the chest freezer with the help of Plywood DIY :
- Draw a mini plan of the plywood divider that contains measurement and compartment details in it.
- Cut the plywood according to the plan and cut as many sheets as possible to make the divider.
- Cut front and back portions too to convert it into a box.
- You can make three medium-level compartments or smaller compartments depending on your preference and need.
- Embed the plywood with a nail to fix it permanently and assemble every section of plywood together.
- Install the divider in the chest freezer and now it’s ready to use.
Use Plastic Dividers for chest freezers :
There are many plastic dividers available in local stores used for storing toys, clothes, and jewelry. You can easily surf the stores nearby and get the exact match suitable for your chest freezer dividers. No extra effort just pre-made plastic organizers for all your needs. Although make sure to measure your freezer before buying any dividers. In addition, it also comes with clear plastics easy to access stored food items when you’re in hurry. Also, make sure that they are of good quality and are recyclable after prolonged use.
MORE POSTS: 11 DIY Succulent Party Favor Ideas
How to organize chest freezers effectively?
Chest freezers can get really messy if you don’t organize your food items every week. To make these tasks easier
- Use DIY items that you find at your home. It doesn’t matter if it is cardboard, plastic, basket, foil, or bags, just figure out ways to put it to use as a sustainable divider. Use all the recycled items if possible so that you can replace the dividers when it becomes impractical for no longer use.
- Make sure you measure the size of the chest freezer to make clear-cut dividers that fit every food item in compartments. Save yourself some time and effort by organizing it with separate compartments for different types of food.
- Label the dividers or use color stickers or baskets to represent a certain section of food item (for example meat section in red color, fruits section in red color, dessert section in pink color, vegetables in green color, and so on…)
- Keep the dividers tall enough so that foodstuff doesn’t get mixed with each other and can also provide maximum storage required. However, these can also ruin the aroma of certain stored food items when different categories of food get blended mistakenly due to lack of organization. For instance, when vegetables get mixed with fruits it can ruin the natural fruit flavor as well as it can deteriorate these food items sooner.
- Check the seals and labels before storing the food item and use the same container for a category of the food item.
- Store perishable items in the back of the freezer and fresh items in the front.
- Put frozen items on top of the freezer so that they can be used as soon as possible before it gets spoiled as it has low longevity than fresh items.
- Use plastic wraps and foils to cover the food items to avoid unnecessary leakage.
- Clean the containers every week to keep the chest freezers smelling good.
Conclusion:
Having a properly organized divider is key to keeping your food safe. You can use multiple DIY options from cardboard, crates, wood, or plastic and make a divider of your choice. Wood dividers are difficult to make and install but it is quite durable. Plastic Dividers are not durable but quite easy to install. Cardboard and crates are easy to install and are a very handy option. It all depends on your preferences and need for a divider for an organized chest freezer.
MORE POSTS: How to make a garden box from pallets